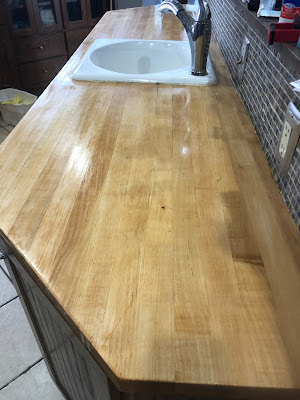
Refinishing Butcher Block Countertops
Refinishing Butcher Block Countertops
Despite popular belief, butcher block countertops should never be used as cutting boards or places to plop down your fruits, veggies, or meats to be prepared.
These styles of counters can hold germs deeper than laminate and can deteriorate MUCH faster if mistreated.
So, when you come across a mistreated butcher block - what can you do?
Well, you can either replace them or refinish them. It's as simple as that. That simple decision, however, can make you or break you. A new butcher block (especially in this pandemic with the wood cost being so high) can run you $750 for a 6-foot chunk of unfinished butcher block.
Unfinished means bare wood. That means you still have work to do after you put it in. You need to either oil the heck out of it or choose to seal it with a lacquer (don't do this) or epoxy (a better choice).
If you choose to go the oil route, you'll be done in no time at very little cost. Epoxy takes time but can withstand more abuse. Make your choice based on how much abuse you anticipate your countertops taking.
If you're refinishing:
If you choose to refinish your existing tops...get ready to put some elbow grease into it. You will be sanding until you can sand no more. Especially if there are deep cuts and layers of lacquer.
What you need:
- Isopropyl Alcohol
- Rubber gloves
- Paint scraper or strong metal spatula
- Rags
- A palm sander (preferably orbital)
- Sandpaper at different grits: 2-40 or 60 grit, 2-100 or 140 grit, 2-300 or 320 grit
- Butcher block oil
- Silicone (white or clear, depending on your preference)
Soaking the lacquer:
Start off by putting on your gloves and soaking your countertops. If you have oiled tops you can skip this step. Pour a good layer of isopropyl alcohol over the lacquer and let it stand for 10-15 minutes. Rub on with a rag in areas that are hard to reach - i.e., behind a sink. You can purchase lacquer remover; however, the fumes are horribly toxic, and it is expensive. Alcohol does the same, and it's safer to use.
Time to scrape:
Now, you can use your scraper (with your gloves on) to start scraping the lacquer off. DO NOT CHISEL OR CHOP AT IT. If it doesn't remove all of it, don't worry. You can either sand it later or rub on some more alcohol and let it sit for a short time longer. NOT all will be removed. The alcohol softens the lacquer and will make it easier to sand.
Once you're satisfied with how much you've scraped, start sanding. Put on your heaviest grit sandpaper and get to work. The remaining lacquer has now been softened and will be taken off easier than not soaking it in alcohol would. Concentrate on deep cut areas, but do NOT let your sander sit in one place. Move it around to avoid divets and uneven ending surfaces.
Those cuts are hard to remove, so it will take some time. Completely remove the lacquer to the best of your best ability. Toss the sandpaper and put on the second piece of heavy grit paper and do it again.
Next move to your medium grit and sand the entire surface (and edges if necessary) with both pieces. It may seem like it's more work than necessary - but leftover lacquer will show after the top is oiled.
Lastly, take your lightest grit paper and sand over the entire surface to smooth out any signs of sandpaper marks. They come with the heavier grits. So, moving to medium and then to light grit will take those marks away.
Once you're satisfied with the removal of imperfections, smoothing of chips or dents, and removal of lacquer, it's time to oil the surface.
OILING:
This is not the last step, but we're getting close!
Clean the countertops with a DRY rag, brush, or broom. Try to get as much dust removed without wetting the countertop. It needs to remain dry for this step.
Now you need to crack open your butcher block oil and get to oiling. Get your clean rag ready. Pour out some oil - about a fist-sized puddle (it will take more than you expect, but don't dump it all out) and smooth out the oil over the countertop and coat every edge you've sanded - adding more as needed.
You may think you're all done, but now you should wait about 4-5 hours and recoat with oil before moving on to the silicone. If you think your countertop needs a third coat - go for it! It won't hurt it, but rather add another layer of protection. Don't forget the edges!
Silicone:
After you've given your oil a day two to settle in, you can silicone around your sink and along your backsplash if needed. Make sure you silicone any area that will leak from your countertop.
Give the silicone a day to cure (it stinks...sorry) and then you're all done!
Before you slap your food down onto the butcher block, take a damp rag and wipe down the surface.
That's it!
So, now you get to decide if you're willing to spend nearly $1,000 for a new top or spend roughly $50 on the supplies it takes to refinish it!
If you'd like to learn how I built my own countertops, check this out! DIY Wooden Countertops


Refinishing butcher block countertops involves sanding the surface to remove stains and applying oil or sealant FlareSolverr installation steps for protection. This restores the wood’s natural beauty and extends its lifespan.
ReplyDeleteTo refinish butcher block countertops,is fortnite free on switch sand the surface smooth, clean thoroughly, and apply food-safe oil or polyurethane for protection.
ReplyDelete