"Lil Vardo" My Homemade Gypsy Wagon, Part 1
~This post contains affiliate links~

I introduce you to "Lil Vardo" my homemade Gypsy wagon!
I did not realize what I was getting myself into when I told my husband I wanted a trailer so I could build one of these...then he brought home a trailer and I REALLY didn't know what I was getting into.
It's been a hell of a process thus far and I assure you I didn't do this the correct way by any means, but it is working for me and the weird way I do things and I'm proud of it.
First things first: The trailer.
My husband came home one day with a trailer that had been a popup camper at one point in time. He bought it for $150 and said, "Here you go! Here's a trailer for your mini-camper!"
Needless to say, I was shocked.

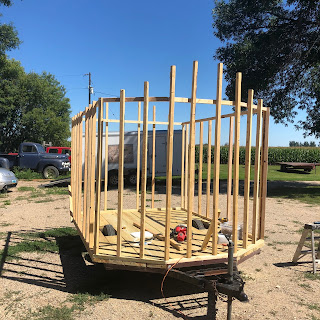
About $250 later, with a LOT of back pain and aggravation, I put 2x12s down for my floor and cut 2x4s in half to build my studs. I used self-tapping screws to secure the platform to the frame and 3" torque screws to put my wall frames together. Did I do that right? I have no idea...is it sturdy? Not yet at this point.
Honestly, I had to take those walls down, put them back up, level them over and over, take them down again...etc. I'm doing this alone, so it's not as easy as it looks. Once I got them (relatively) square, I moved on to the rafters. Oh good lord, the rafters...


This was an enormous fricken headache, to say the least. My trailer platform, which I should have stated earlier, is roughly 7'x10'. That measurement made it difficult to evenly place the rafters. What else made it difficult is that my dumb-a$$ put up two extra studs in the front that completely threw me off for about a day or two.
After I removed and readjusted the front studs, I made some "rafter holders" (or braces if we're going to get technical) so that I could put up the rafters by myself.
Now, this is where I went completely wrong. I bout 12' 2x4s (which left me with the one-foot overhang in the back I wanted) and I decided that cutting an angle all the way down the 12' board was how I was going to "bow" my top. Stupid...stupid...stupid.
Luckily, I have all 9 fingers and half a table saw blade left. My husband came over to help with this part after he heard how loud my f-bombs were getting.
After getting all of the rafters cut and secured to my newly relocated studs, I screwed them down and stained them a beautiful crimson to match the future siding. I want the rafters to show on the inside ceiling, so this step was necessary.

Next up, and with the help of a husband-operating-bobcat-lift, I started on the roof boards.
My plan was just to plywood it and tin it, but it looked so beautiful in wood that we decided that we'd see how well it would hold up in the weather without the tin before we decide to cover it with tin. Since my colors are black and red, the future tin would be black or even rubber roofed to save a step and keep it smooth up top.
I will be adding roof trim on both seems along with an incredible amount of silicone, in hopes that it won't rain on me while I'm sleeping, at a later point in time.
The walls are up next!

That red is really beautiful in person and the wood grain just pops in the sunlight.
This part of the project was a little more difficult than I had imagined, but it's coming along nicely.
I didn't realize when I built this that I would have to jigsaw my front and rear wall panels around every stud...it wasn't as difficult as I had imagined, but it also wasn't fun.
You may have noticed that there are no window holes just yet. I will get to that point. I have put in many windows as afterthoughts on different buildings, so I'm not too worried about it.
I'm not as far along as I'd like to be on this project, but it will get there. I just need about 9 more hours in each day to complete it by winter.
I can tell you one thing though...if I do this again: I will be following the directions I had in the beginning instead of tossing them aside and thinking, "Ah hell...I can do this my own way. It'll work out just fine." I'm pretty positive that those directions (blueprints) would have saved me a couple of weeks of frustration.
Well, that's all so far! I hope you enjoy it as it sits and I can't wait to show you the rest!
In my next update, I'll share the finished siding panels, the completed outside trim, the custom door, and whatever else I decide to add!


This sounds like an ambitious project!
ReplyDelete